Character Controller 101: 3D Development — Movement

Making a character move is different in a 3 dimensional space compared to a 2 dimensional space. Nonetheless, in Unity, it is usually a piece of cake, especially when using the built in Character Controller component already built in the gaming engine (normally, a Rigidbody is used). This time around, I wanted to build my very own Character Controller to really see what’s going on under the hood of this important part of character movement. Let’s dive in and see what’s need to make our prototype or any asset move and jump in our 3D space.
Variables for Character Controller

First, we need to add a primitive 3D object to the Hierarchy. From there, in the Project tab, select the + sign and click C# script. We’re going to name the script Player. After the script is made, double click the script so it opens in Visual Studio or any IDE you’re using.
In your Player class, we want to create the variables needed to calculate the movement of our player. Let’s first create the Character Controller variable, as we will need to grab it and initialize it. We will need a speed, height, and gravity float variable set. Also, we will need to have this calculation depending on the condition of the player being grounded. Here, we will create a boolean.
The speed and direction variable which together will make the velocity. We will also need a Vector 3 for both the direction and the velocity.
Character Controller and Get Component

In Start(), we will will need to grab the Character component. We will use GetComponent for this and check to see if the charactercontroller is null.
Velocity, Direction, and Speed

Next, we will store the calculations of the player movement in Update(). We we’ll need to get the horizontal and vertical axes position of the player. From here, we are going to store the input position in the direction variable. To calculate the velocity, the formula is: velocity = direction * speed. We will store the multiplication of direction and speed in the velocity variable.
User Input

Now that the player have movement functionality, we will need to add a jump mechanic as well. In an if statement, we will check to see if the space bar on your computer is pressed. If it is, then we will apply our jumpHeight value we made above to the y position of the playerVelocity variable. Remember, the playerVelocity variable contains the data for direction.
Call the Move Function

Next, you’ll most likely want your player to return to the ground after it jumps in the air. Here, we will apply gravity to the Y axis of the velocity. We’ll subtract the gravity value, multiplied by Time.deltaTime. Time.deltaTime helps us regulate the game speed, according to the last frame to the current one.
Last, and most importantly, to initialize the calculation, you need to call the Move() method (a built in method for the character controller). Here, we’ll pass in the playerVelocity and multiply it by Time.deltaTime.
Test Movement for Functionality
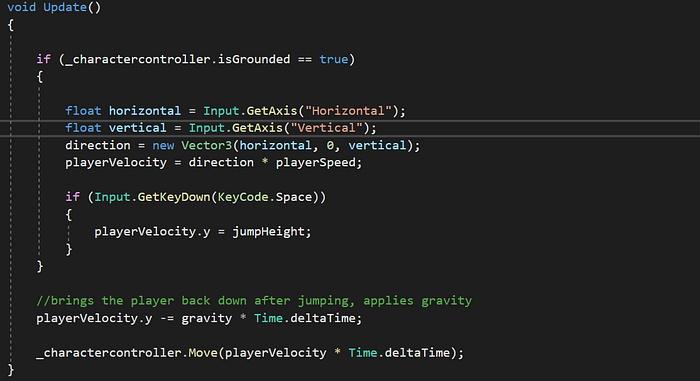
We will also be checking to see if the player is ground before any of these calculation are called, so let wrap this logic in an if statement, setting the grounded bool to true.
Now let’s drag the script onto our prototype capsule, and press play to test the logic. Did it work? The player is moveable by using your WASD keys and the Space bar to jump. You now have a fully moveable player ready to travel around your 3D environment. Moving forward, you will want to create a method and store the data inside instead of putting this logic in the Update method. It will make for cleaner code. But for now, this will due to get your player moving in 3D space.
Next, we will add a camera controller to the player and allow your player to look around at all angles.
